Advanced Resources
Please note
Only applicable for MDos managed cluster deployments
Manage Namespaces, Users, Roles and Permissions
Tenant Namespaces
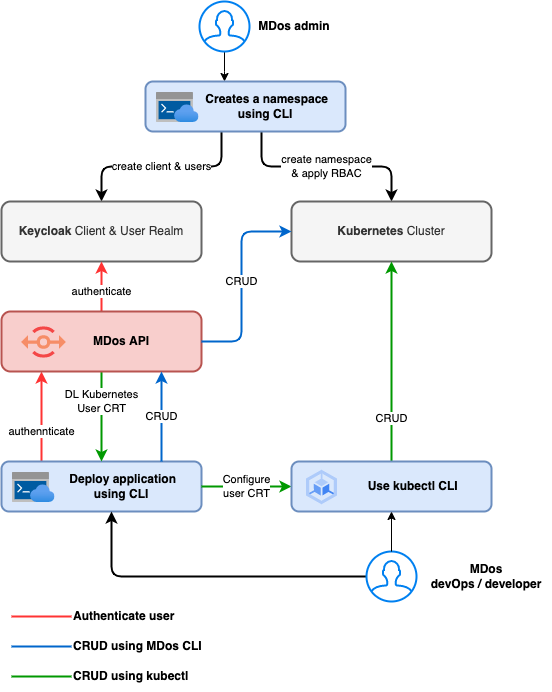 Namespaces in Kubernetes are used to group resources together. You can manage your namespaces manually like you would on any Kubernetes cluster, but if you create them using the MDos CLI, then it will also create a new Client space in Keycload that is bound to the namespace in order to manage Users and roles for authentication and ACL management. This is the base for leveraging extra features on your cluster such as OIDC authentication, RBAC access control and other tenant segregation mechanisms to secure your cluster tenants.
If you have the MDos CLI installed on your machine, then you wont need to install the kubectl CLI to start managing the cluster. You can use the MDos CLI to create your tenants (and there respective kubernetes namespaces), and then create / manage your users and their permissions for those tenant namespaces using the same CLI (more on the Users, roles and permissions in the next section). Those users will then use the MDos CLI to install and configure their respective kubectl CLI according to their roles and permissions (RBAC).
Simply create a new tenant / namespace like this:
Note
By default, only the platform admin can create namespaces. Once you have created other users on the platform, you can give them permissions to create tenant namespaces as well if you wish to delegate tenant management tasks to them.
Namespace Users, Roles and Permissions
If you created a tenant namespace using the MDos CLI, then you will be able to manage users and user roles for this namespace using Keycloak (authentication is based on OIDC OAuth2).
In Keycloak, you create clients and users, then for clients you can create client specific roles. Finally you will assign specific client roles to those users.
MDos comes with a system client called mdos that is used to assign global administrative roles to your users. On top of this, every namespace you create using the MDos CLI will create it's own dedicated client in Keycloak. Those namespaces have a few pre-defined roles already available for tenant specific permission management, but then you can then create your own roles inside this client space that you can leverage to implement your ACL layer inside your applications (more on this in the section Securing applications using OIDC providers).
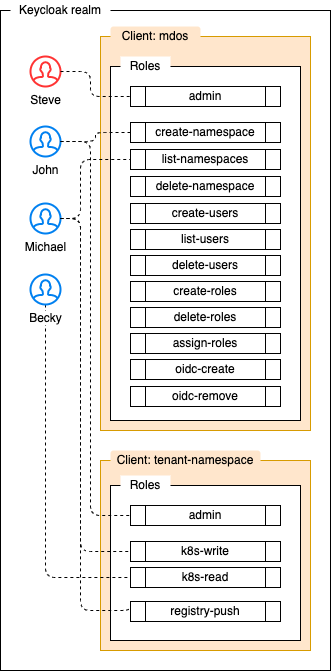
| Keycloak client | Role name | Permissions |
|---|---|---|
mdos |
admin | No limitations, can do everything |
mdos |
create-namespace | Create new clients / namespaces |
mdos |
list-namespace | List all clients / namespaces |
mdos |
delete-namespace | Delete a client / namespace |
mdos |
create-users | Create new users |
mdos |
list-users | List / read all users |
mdos |
delete-users | Delete users |
mdos |
create-roles | Create client roles for any client |
mdos |
delete-roles | Delete client roles from any client |
mdos |
assign-roles | Assign client roles for any client and to any user |
mdos |
cm-cluster-issuer | Create and delete Cert-manager ClusterIssuers |
mdos |
oidc-create | Can create a new OIDC oauth2 endpoint for applications to use |
mdos |
oidc-remove | Can delete OIDC oauth2 endpoints |
| Keycloak client | Role name | Permissions |
|---|---|---|
tenant-namespace |
k8s-write | Can deploy / delete / update applications on the client namespace using the Mdos API |
tenant-namespace |
k8s-read | Can list applications on the client namespace using the Mdos API |
tenant-namespace |
admin | Create / delete namespace specific client roles. Assign namespace specific client roles to any user. List all users for this client namespace. |
tenant-namespace |
-your own role- | Create your own custom role names to use within your applications |
Create a user
Note
You will be given the opportunity to assign existing roles to your new user directly after the new user is created. Of course, you can choose not to for now, and use the command mdos auth user add-role to do so at any time.
Assign namespace specific roles to this new user
mdos auth user add-role
? Do you want to add a role from the Mdos admin client or from a tenant client? (Use arrow keys)
❯ Mdos admin client role
  Tenant client role
Here you have the choice between assigning roles from the Keycloak mdos client or from one of your own tenant specific client. Let's choose to add a mdos client role to this ne user.
? Do you want to add a role from the Mdos admin client or from a tenant client? Mdos admin client role
? Select a role to add from this client: (Use arrow keys)
❯ create-roles
  create-users
  delete-namespace
  oidc-create
  assign-roles
  cm-cluster-issuer
  delete-users
Once you have chosen what role to assign to your user, enter that username to attach the role to:
? Select a role to add from this client: create-namespace
? What username do you wish to add this client role to: my-user-one
Add role to user... done
Note
Refer to the table in the beginning of this chapter for more details on the various roles you can assign to your users.
Create namespace specific roles for your applications
mdos auth tenant create-role

? Select a Client ID to create a Role for: food-shop
? Enter the client role name to create: edit-recipe

Creating Keycloak client role... done
Just like we added a mdos client specific role to our new user, you can now assign this new namespace scoped role edit-recipe to your users as well. For more information on how to use those custom roles, see the chapter (more on this in the section Securing applications using OIDC providers.
Securing applications using OIDC providers
You can protect your applications using OAuth2 OIDC without having to write a single line of code or modify your applications in any way. You have the option of a variety of OIDC providers such as Keycloak, Google, GitHub and others.
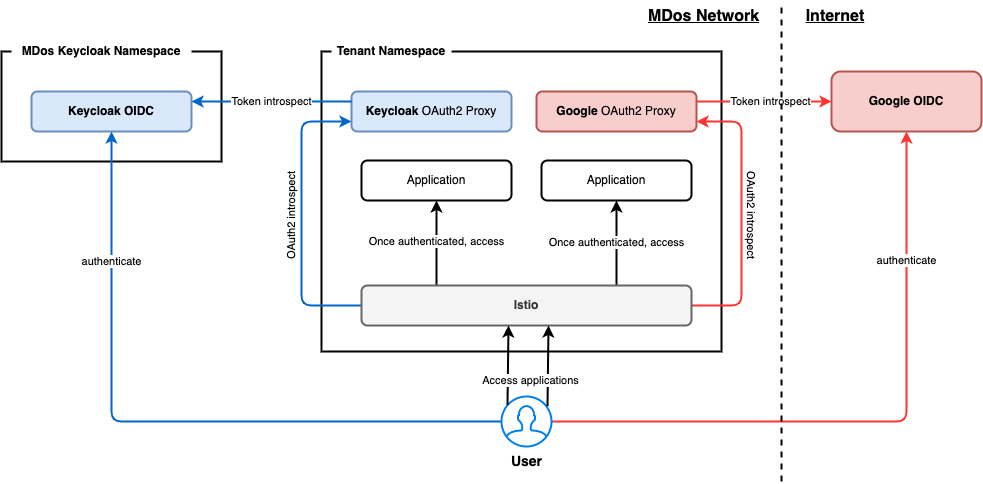
Secure your application using MDos Keycloak OIDC
While you can use various OIDC providers to protect your applications using OIDC authentication, using the integrated Keycloak deployment for your user authentication needs will allow you to also manage your application specific RBAC setup by defining roles and assigning them to your users. MDos uses the open-source solution oauth2-proxy to abstract away the complexity of implementing OAuth2 authentication workflows for your applications.
Secure your application using fine grained ACL supported by Keycloak & OIDC
Let's start by having a look at how you can leverage Keycloak and OIDC to implement your RBAC rules to your applications.
The first step is to create a new oauth2-proxy provider instance for the integrated Keycloak deployment to your target namespace:
mdos oidc provider add

? What OIDC target do you want to add to the platform? Keycloak client
? Select a Client ID tenant-one

Creating Keycloak client & OIDC provider... done
Thats it, you application can now refer to it in order to implement authentication to your application without writing a single line of code. Here is an example that adds OIDC authentication to your specific ingress domain name for an application component:
schemaVersion: v1
tenantName: your-tenant-name
appName: my-app
uuid: XA74S-FXCDI
components:
  - name: secret-app-component
    image: your-tenant-name/my-app
    uuid: E5PLU-TQMBD
    tag: 1.1.0
    services:
      - name: http
        ports:
          - port: 80
    ingress:
      - name: main
        matchHost: secret.mydomain.com
        targetPort: 80
        trafficType: http
    oidc:
      provider: kc-tenant-one
      hosts:
        - secret.mydomain.com
In this example, we link our new oauth2-proxy kc-tenant-one to our application component secret-app-component, and protect the domain secret.mydomain.com with it.
Once this application is deployed and you try to access it on the domain secret.mydomain.com, you will be redirected to the Keycloak login page. Once authenticated through Keycloak, you will gain access to your secret application.
Info
The domain name you protect has be be configured as an ingress to this application component as well, otherwise there is no access to this component to protect in the first place.
But that's not all we can do here, let's go one step further and have a look as of how you can leverage your user sessions and their associated roles using your own ACL / RBAC layer from within your application (creating users and roles, as well as assigning roles to those users is described in the chapter Namespace Users, Roles and Permissions).
Once this user hits your application, the user is already authenticated and we are sure that we have a valid JWT token available in the header of the request under the property named authorization. So all we have to do now is to decode this JWT token using a language specific JWT library (all modern languages have such a library available, usually through a third party library). Once decoded, you will find all keycloak clients (corresponding to the application tenant namespace) this user has permissions for, as well as the specific roles added to this specific user in each respective client space. Simply use this information to allow / disallow fine grained access to the various features of your application:
resource_access.<CLIENT_NAMESPACE>.roles['role-1', 'role-2', ...]
Tip
In the near future, it will be possible to specify global access to an application based on user roles directly from within your mdos.yaml configuration file. This will not allow you to do fine grained access control to specific users on specific parts of your application like the example we are showing you here, but il will allow you to restrict global access to applications based on their user roles without having to implement anything on your side. This new feature is currently under development.
Secure your application using third party OIDC providers
You can also leverage public OIDC providers for your authentication needs such as Google, Github and others. To do so, you will have to configure your external auth provider in order to get your access key, necessary to configure the oauth2-proxy instance dedicated for this external OIDC provider.
For more information of how to configure your Google account for instance can be found here.
Creating a Google auth based OIDC provider, use the command:
and follow the directions.
Info
As of now, only Google is available through the MDos platform as an external OIDC provider. Github authentication and others will follow soon.
Managing your Issuers & TLS Certificates using Cert-Manager
Cert-manager is a great extension for Kubernetes, allowing you to generate and manage your domain specific TLS certificates automatically. That said, you still need to understand how to configure it for your needs.
The first thing you need is a certificate issuer. Those are used to interact with your Certificate authority and your DNS provider in order to configure the necessary challenges required to obtain your certificates.
Certificate Issuers
Let's say you purchased the domain name mdos-is-awesome.com. You now need a valid certificate so that you can use your domain name to access your applications. The type of issuer you will have to create depends on the DNS provider you use to manage your newly purchased domain name. Here are a few examples of DNS providers that cert-manager supports directly:
- Akamai
- AzureDNS
- CloudFlare
- Route53
- DigitalOcean
But others can be configured as well, using external third party webhook instances.
Tip
For further details about available issuers and how to configure those, please refer to the cert-manager documentation available here
So how do you create a new issuer for your new domain name?
Issuers are deployed using a simple yaml file. Please note that you only need one issuer per DNS provider account, once you have configured this issuer, you can reference it for every new domain name certificate you wish to create.
Let's say your domain name is managed by CloudFlare, in this case you can create a new issuer for your domain name with the following yaml file:
In this example, you have a Secret that holds your CloudFlare API Key (that you get from your CloudFlare account profile page), and a Issuer.
The issuer references a Certificate authority, in this case we use Let's Encrypt to generate the certificate for us (line 14, acme is used here, all we need to do is point to the desired certificate management API endpoint on line 16).
On line 21 we specify the DNS solver that is managing our domain name(s). This part will need to be configured to point to the Secret we create in the first block, the one that holds our CloudFlare API Key, and our CloudFlare account email address (line 22).
Note
Depending on your specific requirements in terms of domain DNS manager and certificate authority, this yaml file will have to be adapted to suit your needs. Again, further details of how you can configure those can be found here
You are now ready to deploy this Issuer onto your cluster using the MDos CLI:
mdos cm issuer create

? What type of issuer do you wish to create? ClusterIssuer (Cluster wide)
? Enter the path to your Issuer YAML file: /Users/mdundek/issuer.yaml

INFO : ClusterIssuer name: my-cloudflare-issuer

Creating issuer... done
Tip
Depending on your needs, there are to Issuer types you can choose from: Issuer or ClusterIssuer. Depending on the issuer type, you will be able to create certificates from any tenant namespace (ClusterIssuer), or only for a specific tenant namespace (Issuer).
That's it, you are ready to create certificates for this issuer.
To list your available issuers, run the command:
mdos cm issuer list

 CERTIFICATE NAME                    NAMESPACE                STATUS
 ─────────────────────────────────── ──────────────────────── ──────────────
 my-cloudflare-issuer                none (ClusterIssuer)     Ready
If your issuer has the status READY, you are good to go to generate some certificates for us.
Create new certificates for your applications
This part is easy, now that we have a working Issuer, we can go ahead and generate a certificate for one or multiple domain names at once. To do so, execute the command:
On line 6, we selected our Issuer instance we created previously, and on line 7 we can list all domain names (including wild card domains if available) as we need for this certificate.
Let's list the available certificates on our cluster:
mdos cm certificate list
? Select a namespace for which to create a certificate for: my-tenant-namespace

 CERTIFICATE NAME         ISSUER NAME                 STATUS         MESSAGE
 ──────────────────────── ─────────────────────────── ────────────── ─────────────────────────────────────────────
 mdos-is-awesome-crt      my-cloudflare-issuer        Ready          Certificate is up to date and has not expired


 TLS SECRET NAME
 ──────────────────────────────────
 mdos-is-awesome-crt
Here you can see that the certificate object is Ready, and the generated kubernetes Secret is available under the same name than the certificate object you just created.
That's it, you can now move on to use this new secret in your Ingress-gateways, this will be detailed in the next chapter, so just read on.
Managing your Domain specific Ingress-Gateways
 Ingress gateways are used to instruct Kubernetes on how and what domain names to expose outside of the kubernetes cluster. Is is a cloud native
 reverse-proxy so to speak that listens for traffic on specific ports and for specific domains. You can configure your certificates on those gateways if you wish to terminate the TLS connection before traffic reaches your application for certain domains, or let the traffic pass through as-is to your target applications, allowing you to terminate the TLS connection in your application directly.
Warning
When you create a new Ingress Gateway for a specific tenant namespace, it will do nothing on it's own until you deploy an application that configures a ingress rule for it. In other words, if you define an ingress config on one of your application components, then you first need to configure your Ingress gateway to allow this traffic type for your domain. More on this in the next section.
So that's for the theory of it. Lets' see how you can create a new Ingress Gateway in your tenant namespace:
mdos ingress-gateway add

? Select namespace for which you wish to edit the Ingress Gateway for: my-tenant-namespace
? What type of traffic are you intending to enforce for this config? (Use arrow keys)
❯ HTTP (Listen on port 80, forwards to port 80)
  HTTPS, pass-through (Listen on port 443, forwards to port 443)
  HTTPS, terminate TLS (Listen on port 443, forwards to port 80)
...
First, you select the tenant namespace for which you want to create a new gateway for.
Second, you have to specify what traffic type you wish to configure on that gateway (HTTP, HTTPS, terminate TLS, or HTTPS, pass-through).
Let's say we choose to create a configuration that will terminate the TLS connection on the gateway itself for a specific domain name. We are not talking about ingress configs yet, first we need to configure our gateway so that it knows that we want to route certain domain names in a specific way. So if I select the option HTTPS, terminate TLS, it will allow us to select amongst all available TLS certificate secrets found in that namespace.
...
? What type of traffic are you intending to enforce for this config? HTTPS, terminate TLS (Listen on port 443, forwards to port 80)
? Enter a target domain name (ex. frontend.mydomain.com): mdos-is-awesome.com
? Would you like to add another domain name host to this Ingress Gateway? No
? What TLS secret holds your certificate and key data for these domains? mdos-is-awesome-crt

Creating ingress-gateway server config... done
The Ingress Gateway is now configures to allow this type of traffic for your application ingress.
You can list your gateway configurations using the MDos CLI:
mdos ingress-gateway list

? Select namespace for which you wish to list Ingress Gateways for: my-tenant-namespace

 TRAFFIC TYPE             HOSTS               SECRET
 ──────────────────────── ─────────────────── ────────────────────
 HTTPS, terminate TLS     mdos-is-awesome.com mdos-is-awesome-crt
Configure an ingress rule for your application that uses this gateway config
Now that we have our ingress gateway configured to allow incoming traffic for our new domain mdos-is-awesome.com on port 443 that terminates the TLS connection on the gateway for us, we can configure this domain name as an ingress in our mdos.yaml application metadata file. We recommend to use the MDos CLI to do this, but you can also do this manually by editing the mdos.yaml file.
Let's use the CLI here to configure our ingress. Position your terminal inside your application component directory, and execute the command:
mdos generate ingress

? Enter a name for the ingress: my-ingress
? What domain name do you want to use to access your component: mdos-is-awesome.com
? Do you want to match a subpath for this host (fan-out)? No
? What target port should this traffic be redirected to? 80

NOTE: Make sure you have configured your namespace specific "Ingress Gateway" to handle this domain name and traffic type (HTTP and/or HTTPS).
If your application requires that a dedicated certificate is available inside your POD (versus terminating the TLS connection on the gateway), then specify HTTPS here.

? What type of traffic will this ingress redirect to? http
This will update your application mdos.yaml file with the new ingress rule:
Info
MDos will automatically identify what Ingress Gateway matches this ingress configuration when you deploy it, and use it to expose your application for that domain.
Now what if you wish to terminate a TLS connection directly in your application? Simple, set the trafficType to https, and it will use the Ingress Gateway that is configured to let HTTPS traffic pass through all the way to your application on port 443. You will of course need the certificate key and crt files to terminate this connection inside your application, simply reference the TLS Secret that holds the certificate files from your namespace, and mount it as a volume inside your pod. Here is the mdos.yaml configuration that will allow you to do so:
This will mount the files tls.crt and tls.key inside the folder /etc/x509/https on your running containers. You can now use those to terminate your TLS connection.
Populate static volume data for your applications
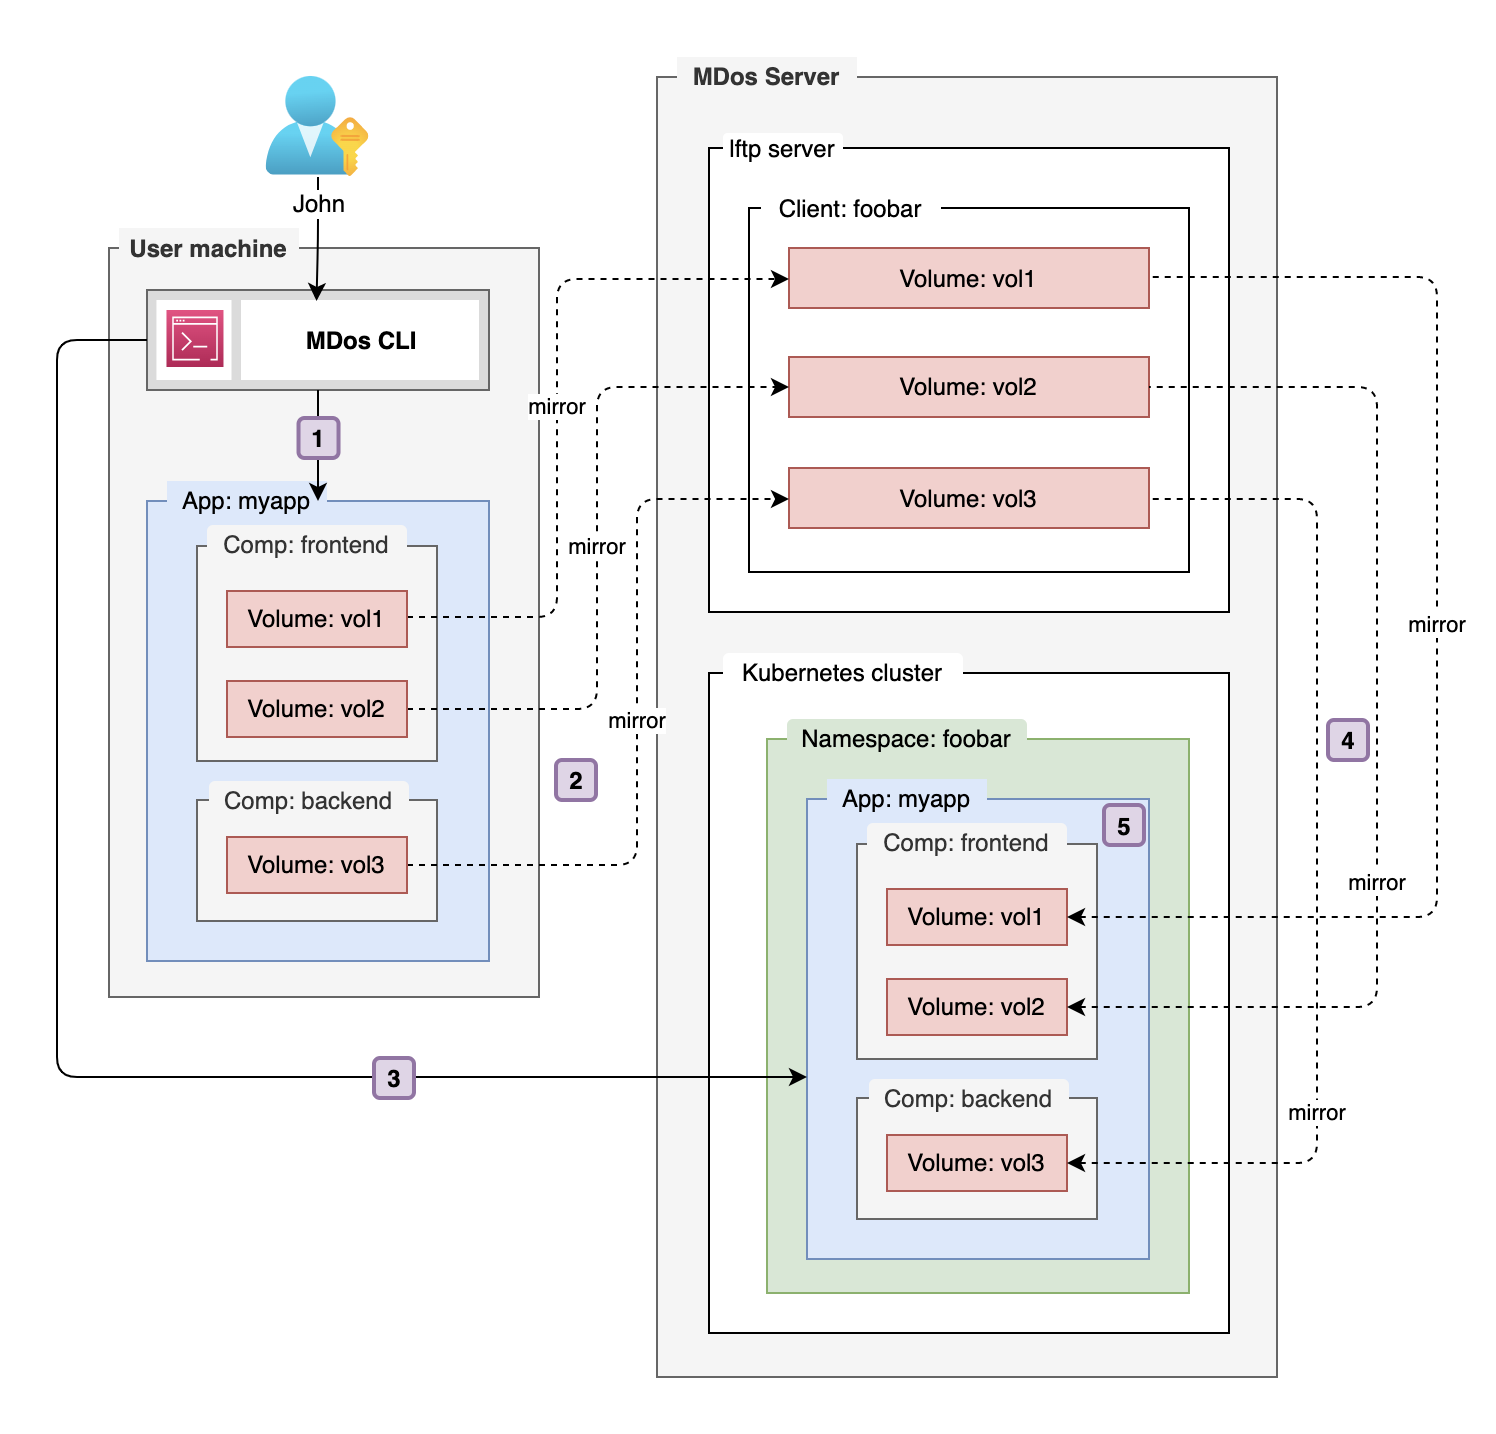 Every new volume that is created for your application is completely empty at first! This is how Kubernetes deals with volumes (also known as Persisted Volumes in the Kubernetes world)? So what if I have some data that I would like to put into this volume that my application depends on? Initial database schema & dataset, a static website that serves as a base for my application etc. Often, an empty volume is what you want in a persisted volume, but sometimes your volumes need data to be present at application startup. So what usually happens is that you have to complexify your app with all sorts of init mechanisms that detect an empty volume, and populate it before you can actually start using it. Bringing data to PVCs is difficult!
MDos provides an efficient way for dealing with those use-cases. An MDos application project can have volumes declared that contain data you wish to pre-load onto your PODs before your application starts on the cluster. You will simply have to add the flag syncVolume: true to the declared volume inside your application component in your mdos.yaml file, and mdos will automatically sync this volume data to your pod volume before it starts your application component (see Pre-populate volumes in the reference documentation for an example configuration for your mdos.yaml file).
Let's have a look at the above example to see in details what actually happens here:
| Step | Description |
|---|---|
1 |
When the user runs the command mdos application deploy, the CLI will look for volumes that are flagged with the attribute syncVolume: true in all application components. |
2 |
The MDos CLI will then initiate a ftp mirror command to synchronize your local volume files with the MDos FTP server |
3 |
Then your application is deployed onto the cluster |
4 |
Before the application actually starts, it will first mirror back your volume data from the MDos FTP server to your application Persisted Volume |
5 |
Once the data is fully synchronized, your application starts up and has access to your pre-loaded files |
Note
All this happens automatically with the command mdos application deploy, you do not need to worry about these steps, nevertheless it is useful for you to understand what is actually happening under the hood.