MDos application reference documentation
Anatomy of an application
 Applications are to be seen as a higher level concept, an application in
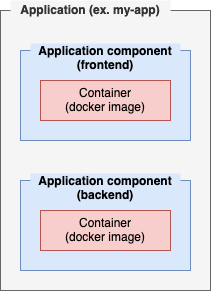
 mdos is composed of one or more application components. Application components are your actual project asset placeholders (source code), where one component could be an API backend server for instance, and a second component would hold your front end application and so on.
Every application component can have one or more volumes attached to it for storage persistance & data mirroring.
This architecture allows you to compose complex applications to suit your needs.
A MDos application project layout is composed of one or more folders, each one representing an application component.
At the root of the application folder is a mdos.Please Noteyaml file that holds all runtime configuration parameters for the application and it's components:
my-application/
├── backend
│   └── Dockerfile
│   └── <your application code files>...
├── frontend
│   └── Dockerfile
│   └── <your application code files>...
├── volumes
│   └── static-website
│       └── index.html
│       └── ...
└── mdos.yaml
In this example we have an application named my-application, that is composed of two distinct application components: backend & frontend.
Each component has it's own Dockerfile.
At the application level, there is also a volumes folder where you can store application component volume files to be used within your application, and a mdos.yaml config file that holds all runtime configuration parameters. As an example, here the volumes folder has a subfolder called static-website that is used by the frontend application so serve it's website data.
Note
Volumes are managed on the application level rather than on the component level in case you wish to share volumes amongst components.
my-application/
├── backend
│   └── Dockerfile
│   └── <your application code files>...
├── frontend
│   └── Dockerfile
│   └── <your application code files>...
└── mdos.yaml
In this example we have an application named my-application, that is composed of two distinct application components: backend & frontend.
Each component has it's own Dockerfile.
At the application level, there is also a mdos.yaml config file that holds all runtime configuration parameters.
Manifest file: mdos.yaml
Each application is configured in a YAML file at the root of the application folder. This is the equivalent of your lower level Kubernetes yaml files, but all concatenated into a single, higher level configuration file that greatly abstracts away the complexity of Kubernetes deployment.
We will now have a closer look at what you can configure in your application mdos.yaml file.
Application
Each mdos.yaml file starts with global configuration parameters specific to this application:
The tenant-name field maps directly to a kubernetes target namespace.
The uuid field is a unique identifier for this application, all dependant resources that this application will create and manage will be tied to this application uuid.
CLI command
mdos generate application
Application component
Each application component will translate to a specific deployment on the cluster. Just like an application, a component has some base values that need to be set:
Among those, you will define your component name, image name and image tag to use.
CLI command
mdos generate component
When using the MDos CLI to scaffold your application component, then the CLI will ask you to select amongst multiple network isolation options. You can read more about NetworkPolicy isolation configurations in the section here
Registries
Registries are where your MDos will push and pull your application images to/from. Multiple choices are available here.
Use the MDos registry
Please note
Only applicable for MDos managed cluster deployments
MDos comes with a private integrated Docker registry. If no registry parameter is set on your component yaml block, then this private internal registry will be used to push / pull the images from. No extra configuration parameters are required if this is the registry you want to use.
Use a custom registry
If you have your own private registry that you would like to use for your application images, you can do so by specifying a registry value on your component, along with an optionnal imagePullSecrets value that should be used to authenticate with your registry:
Note
Since you are using your own private registry, it will be up to you to provision your private registry Secret on the target namespace.
Use a public registry
The third option is to use a public registry, again with an optionnal imagePullSecrets value that should be used to authenticate with the public registry:
Disable image builds on deploy
In some cases, you might not want to build your image when you deploy your applications using the command mdos application deploy. This could be the case if you use DevOps pipelines (GitHub Pipelines, Jenkins...) that already take care of building your images for you. In this case, simply add the flag doNotBuild: true to your component to disable this behavior for a given component:
Note
As mentioned above, if you use this flag, make sure your images are present in the target registries before deploying.
Overwrite container default command on start
If you wish to overwrite the command used by a container on startup, you can so so like this:
or along with command augments:
Persisted Volumes
Volumes in Kubernetes come in all sorts and chapes. The most common one being the Persisted Volume to store your application data, but volumes can also be composed of files stored as ConfigMaps and Secrets, or a combination of both.
Let's have a look at the various ways to use volumes in MDos.
Standard volumes
This is the de-facto volume type, standard volumes are PersistedVolumes in Kubernetes, they start out empty (see them as a new partition that get's mounted onto your application environment) so that you can write data to it and ensure this data is persisted even on reboots, crashes...
Volumes are defined by a name, a mountPath that indicates where this volume partition needs to be mounted onto your application POD, and a size parameter to indicate what size this volume should have (size of the volume partition to be allocated).
The default StorageClass is based on the open source project Longhorn, a Block Storage solution that is very convenient and versatile.
CLI command
mdos generate volume
Shared volumes
Please note
Only applicable for MDos managed cluster deployments
Shared volumes are NFS based volumes that can be shared amongst multiple application components. To use them, those volumes need to be created upfront using the following command:
Once this volume is created on the cluster, you can reference this volume in your application components:
CLI command
mdos shared-volume create
mdos generate volume
Pre-populate volumes
Please note
Only applicable for MDos managed cluster deployments
This MDos feature is designed to facilitate the way you can pre-populate files and folders into your volumes before your application starts up. This is useful when you wish to pre-load a database with a pre-defined dataset, or to deploy a static website for example.
Your MDos project contains a volumes folder at the root, create a volume folder in there and store your static data in it. Then add the flag syncVolume: true to your volume config like this:
| "trigger" possible values | Description |
|---|---|
| initial | Synchronize local volume content only if the POD target volume is empty (first deployment) |
| always | Synchronize local volume content every time this application is deployed |
Example volume folder structure in your MDos project folder:
| Project structure | |
|---|---|
Then, when you deploy your application using the command mdos application deploy, this data will be synchronized with your application component volume before it starts.
CLI command
mdos generate volume
HostPath mounts
HostPath volumes do not use PersistedVolumes, they are direct mount points from the host file system with the application container. Those volume types are not recommended, they do not scale and are only recommended for debugging purposes.
CLI command
mdos generate volume
ReadOnly volumes & files
Read-only volumes are volumes that contain data such as certificates, scripts or any other type of files that your applications depend on to work.
Using Secrets
You can create and mount a Kubernetes Secret as a volume mount point using two different approaches:
Here, your secret will be mounted as a directory, meaning that all values from your secret will be available as files inside your mountPath directory.
Changing secret values
This is a good approach if your Secret get's updated from time to time, this way of mounting Secrets in a Kubernetes ensures that those updated values are reflected back in the mounted files inside your PODs without restarting them.
In this case, you can mount individual files from a Secret, rather than a whole secret.
CLI command
mdos generate secret
Using ConfigMaps
You can create and mount a Kubernetes ConfigMaps as a volume mount point using two different approaches:
Here, your secret will be mounted as a directory, meaning that all values from your ConfigMap will be available as files inside your mountPath directory.
Changing ConfigMap values
This is a good approach if your ConfigMap get's updated from time to time, this way of mounting ConfigMaps in a Kubernetes ensures that those updated values are reflected back in the mounted files inside your PODs without restarting them.
In this case, you can mount individual files from a ConfigMap, rather than a whole ConfigMap.
CLI command
mdos generate config
From existing ConfigMap or Secret
It is also possible to mount Secrets or ConfigMaps from external references inside your container POD's, rather than creating those objects along with your application deployments. This is useful if you need to decouple the lifecycle of your Secrets or ConfigMaps from your actual applications themselves. As an example, imagine a Secret that holds your application certificate data that is managed by Cert-Manager, those secrets might get updated in any point in time and your application deployment should in no way overwrite this Secret data on deployments. In this case, you will simply reference the target secret you wish to mount. Of course, those Secrets and/or ConfigMaps should exist upfront before you deploy your applications that make use of them.
CLI command
mdos generate secret or mdos generate config
Environment Variables
Environment variables are a core concept of almost any cloud application. They can also be content sensitive in some cases (ex. passwords, private keys...), in which case you should consider using Kubernetes Secrets rather than ConfigMaps, or directly coding those as environment variables in your deployment YAML files.
Using ConfigMaps or Secrets
If all you need is to set environment variables for your application components, use the following example:
CLI command
mdos generate secret or mdos generate config
From existing ConfigMap or Secret
It is also possible to reference Secrets or ConfigMaps from external references inside your container POD's, rather than creating those objects along with your application deployments.
Of course, those Secrets and/or ConfigMaps should exist upfront before you deploy your applications that make use of them.
CLI command
mdos generate secret or mdos generate config
Networking
Exposing ports using services
Applications often expose services using a specific port(s). Remember, in Kubernetes, POD IP addresses are ephemeral. They change every time your POD is restarted. To allow applications to talk to your application services, you need a Kubernetes Service object to allow your application component to be auto-discoverable by other application components, hens the Service in Kubernetes.
To create a service endpoint for your various ports, use the following syntax:
CLI command
mdos generate service
Configure Ingress
By default, applications in Kubernetes are only reachable from other components that are also running inside your cluster. To make application component services accessible from outside your cluster, you will have to add an ingress to your application component, this will expose this service endpoint to the outside world using a host / domain name.
| "trafficType" possible values | Description |
|---|---|
| http | The ingress will be configured to route traffic coming from port 80 to the port specified in targetPort |
| https | The ingress will be configured to route traffic coming from port 443 to the port specified in targetPort |
Note
If your matchHost value is a subdomain of your root MDos domain name configured during the platform installation and your traffic type is https, then nothing else is needed for ingress to work OOTB.
Now if you would like to use a different host / domain name to respond to your traffic for this component ingress, then you will have to create a ingress-gateway object first using the command mdos ingress-gateway create. For more details, refer back to the chapter Managing your Domain specific Ingress-Gateways.
| "trafficType" possible values | Description |
|---|---|
| HTTP | The ingress will be configured to route traffic coming from port 80 to the port specified in targetPort |
| HTTPS_SIMPLE | The ingress will be configured to route traffic coming from port 443 and terminate the TLS connection before routing the traffic to the port specified in targetPort. If set, a secret reference name holding the TLS certificate details (crt & key) needs to be provided as well |
| HTTPS_PASSTHROUGH | The ingress will be configured to route traffic coming from port 443 to the port specified in targetPort as is, the application will need to listen for incoming HTTPS traffic and terminate the TLS connection there |
CLI command
mdos ingress-gateway create
mdos generate ingress
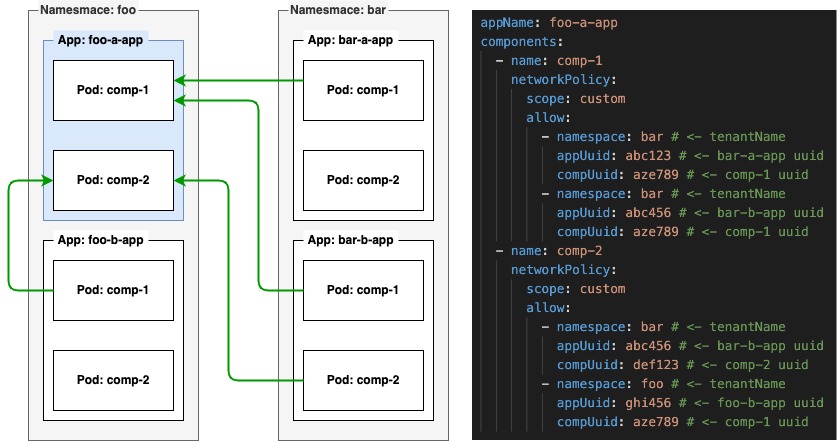
NetworkPolicy
On a multi-tenant cluster environement, it is important that you protect your components from being accessed from other application components. There are 4 available configuration settings available for you to use:
| Scope | Description |
|---|---|
| private | No one can talk to this component |
| limited | Only components belonging to this application can talk to this component |
| open | All application components in this tenant namespace can talk to this component |
| custom | You can specify which components in what namespaces can talk to this component |
This is how you configure this on your component:
The custom scope let's you specify specifically what application components from what namespaces are allowed to communicate with this component.
Here is a more complex example that uses a custom scoped NetworkPolicy (please note the addition of the allow array value in this case):
Component dependencies
If your component has a strong dependency with one or more of your application components, and it should wait until those components are up and running before starting this component, then use the flag dependsOn:
This will provision a initContainer that will monitor your other components, effectively delaying it's start up until those conditions are met.
OAuth2 OIDC
Please note
Only applicable for MDos managed cluster deployments
You can protect your applications using OAuth2 OIDC without having to write a single line of code or modify your applications in any way. You have the option of a variaty of OIDC providers such as Keycloak, Google, GitHub and others.
To find out how to configure and add your OIDC providers, please refer to the chapter Securing applications using OIDC providers for more information.
Protect your ingress with a OIDC provider
To add OIDC authentication to one of your application configurations, simply specify which OIDC provider you want to enforce, and what hostname that was configured in your ingres section you want to be protected.
There are numerous OOTB providers that you can configure, but the most flexible and customizable is the integrated Keycloak OIDC provider. It will allow you to create any role according to your needs, assign them to your users and gain access to those roles from your authenticated user sessions encoded in the JWT token. Simply use those roles within your applications to then determine fine grained ACL rules you wish to enforce.
Info
For an example using the Keycloak OIDC authentication provider with custom roles and ACL, please refer to the chapter Securing applications using OIDC providers
CLI command
mdos application protect
Set pod resources
This allows you to impose limits in terms of CPU / memory resources you application components can use.
Execute pre-build commands
MDos allows you to execute commands on the local machine every time you are about to deploy your application onto your Kubernetes cluster. Simply list the commands you wish to execute, and they will execute every time you run the command mdos application deploy.
In this example, we are building a mkdocs project, then copy the resulting files over to the proper volumes directory ready for deployment